
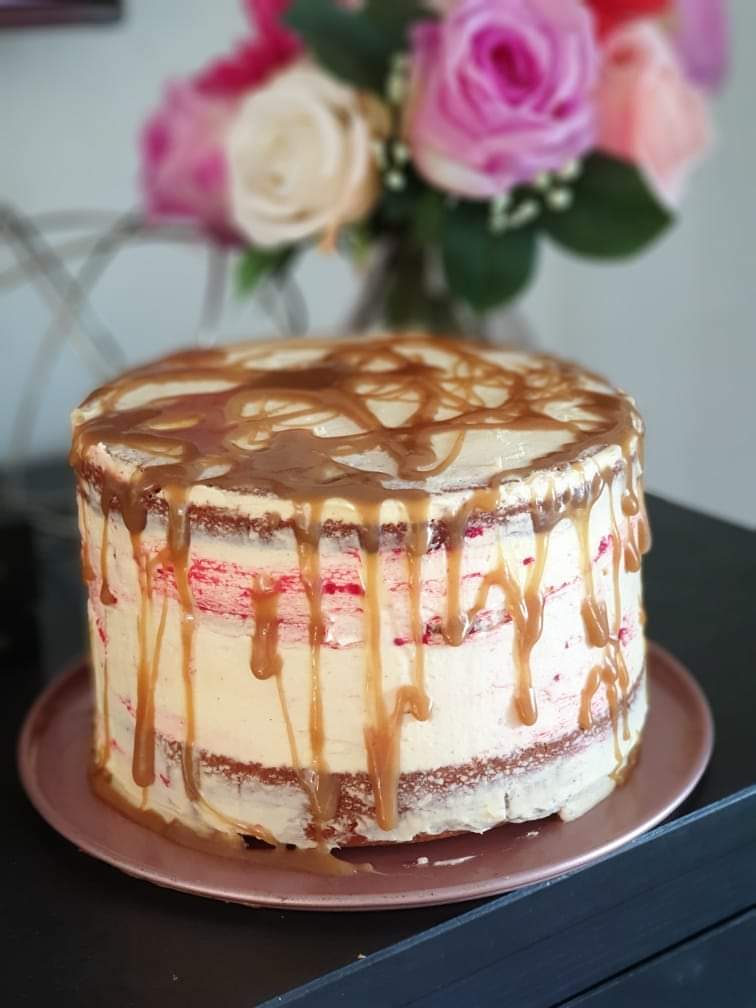

I made this cake for my dad’s birthday a couple of years ago & it turned out even better than I imagined. The cake is so light & fluffy, & the vanilla notes compliment the tangy raspberry flavour wonderfully. Adding the white chocolate & salted caramel flavours really put this cake over the top. It really is the perfect cake for an special occasion.
12 servings
Ingredients:
For the cake:
226g unsalted butter, room tempreture
380g white sugar
6 large eggs, room tempreture
1 1/4 cup buttermilk, room temreture
1/4 cup vegetable oil
396g cake flour
2 1/2 ts baking powder
1/2 ts salt
1 vanilla bean
For the icing:
700g white chocolate
500g mascapone cheese
2 cups thickened cream
For the raspberry jam:
1 1/2 cup fresh or frozen raspberries
1 TBS lemon juice
1/2 cup white sugar
For the salted caramel drip:
1/2 cup caster sugar
1 tbs water
2 tbs unsalted butter
1/4 cup thickened cream
1/2 tbs flakey sea salt
To make the cake:
Preheat the oven to 180C & butter 3, 6inch round cake tins. Line each pan with baking paper, cut to fit the bottom of each pan.
Use a kitchen scale to weigh out ingredients.
Cream the butter & sugar together in a large bowl either with a stand mixer using the paddle attachment, or using a hand mixer. Mix until light, & fluffy in consistency, & pale in colour.
Scrape the bowl down, & add in the eggs one at a time, mixing in between each egg. Make sure each egg is fully mixed in before adding the next.
Next, add in the seeds from the vanilla bean, oil & buttermilk.
In a medium sized bowl, add the flour, salt & baking powder & whisk to combine.
Add the flour mixture, a little at a time to the wet ingredients, mixing & scraping the bowl down as you go. Once the mixture is almost all combined, mix the last little bit in with a spatula to ensure you don’t over mix.
Pour the cake batter into the prepared tins. I like to use a scale to ensure each tin has the same amount of batter, but you can eye-ball it if you prefer.
Tap each tin gently on the bench to remove any air bubbles.
If you are using cake pan strips, pop them on to each of your pans (I just love these, they ensure you don’t end up with domes on your cakes which means you don’t need to fiddle around with flattening them later)
Bake the cakes in the oven for 15-20 minutes or until they bounce back when lightly pushed, or your insert a knife into the middle & it comes out clean.
Allow cakes to cool slightly in the pans, then remove & cool to room temperature on a wire rack.
While the cakes are baking, let’s make the jam!
Add the raspberries, sugar & lemon juice to a small saucepan, set over a medium heat.
As the raspberries cook, mash them into your desired consistancy.
Continue to stir the jam until it reduces a little & thickens enough to coat the back of a wooden spoon. The jam will thicken a little more as it cools.
Remove from stove, & set aside to cool.
To make the icing:
Melt the white chocolate over a *double boiler, & set aside to cool slightly.
*A double boiler can be substituted for 2 pots, one with simmering water and the other stacked ontop without touching the water.
Using a stand mixer, with the whisk attachment (or a hand held mixer) whisk the mascarpone until smooth then slowly drizzle in the white chocolate. Scrape down the bowl as you go.
Add in the cream, & whisk until you get stiff peaks. Transfer to a large bowl & chill in the fridge until needed.
To make the caramel drip:
Get a small cup filled with about 1/4 cup of water, & a pastry brush & set it near the stove top, ready to use if needed.
Add the sugar & water to a small saucepan, set to a medium-high heat.
Do not stir the caramel! Use the pastry brush dipped in a little water to wash any sugar granuals into the saucepan if needed.
Cook the caramel until it reaches an amber colour. Do not walk away during the cooking process, as caramel can turn to amber, then burn awfully fast.
Once your caramel has reached an amber colour, remove from the heat & stir in the cold butter. The caramel will bubble up, so be careful! Don’t panic if the caramel starts to stick together, keep stirring & it will smooth out again.
Once the butter has melted, add in the cream & salt. Stir to combine.
Transfer to a bowl & allow to cool on the bench. Don’t put it in the fridge as it may become too hard to pour onto the cake once it has been iced.
Let’s assemble the cake!
Don’t panic if your cakes have a little dome! Use a serated knife to shave off the dome until the cake is nice & flat. There are lots of youtube tutorials out there if you would like a visual.
Dolop a tablespoons worth of icing onto a round 8-10 inch cardbord cake board, set over a cake stand, or ideally a turn table. This gives you a solid surface to ice your cake on.
Fill a piping bag, fitted with a large round tip with 1/4 of the icing.
Invert one of the cakes onto the cake board.
Pipe a solid ring on top of the cake later to form a border.
Fill the middle of that border with a thin layer of jam, using a small offset spatula or the back of a spoon to smooth it out.
Repeat with the next layer then add the third cake to create a top, adding more icing to the piping bag if you need to.
Next, add a ring of icing to the stop layer, & to all the layers of cake – you should have 4 icing rings in total.
Use an offset spatula to smooth out the icing so it covers all of the cake. You can add more icing as you go if you need. This is a semi-naked cake, so it doesn’t need to cover every inch of the cake, but rather it just has a thin layer of icing all over the cake.
Ensure the top of the cake is well covered with the icing.
Once you are happy with the icing, grab a spoon & drip your caramel over the cake, in any pattern you wish, adding as much or as little as you like.
Serve immediately or store in the fridge for up to 4 days.
Enjoy!


Leave a comment